With much difficulty I have finally found what the best compressed video converter for nokia e90. I have searched a lot in the internet for these converter/encoder and finally landed up in a free software called super which can be downloaded from www.erightsoft.com/SUPER.html
The native resolution of the e90 video is 600X480 but the video to be totally occupying the inner screen is 800 X 352 but the video is too much stretched so I have use 780 X 352 and depending upon your memory card you can increase the audio and video quality as I have used the optimal one so as to occupy minimum space.
If anyone wanted the presets for this converter you can mail me at lafikea@rediffmail.com and I will definitely send it at the earliest.
Tuesday, November 11, 2008
Saturday, June 28, 2008
Speed up your xp boot double times.
Well when you are in a hurry and time is quite important waiting for windows to load its drivers is a headache or your windows load slower than usual well you could tweak them so that the booting time could be the double....
*I think it is important to mention the fact that when any operating system loads it is in fact making it drivers run or rather compiling it. So basically we have to wait for some time though. :)
Though there are plenty of services which xp needs to function correctly but at the same time there are plenty of features in Windows XP that you may not use at all. You can disable any service that you do not want to run. The fewer services that run, the more quickly Windows XP will boot.
CAUTION:
Be very careful when stopping services as that might also cause windows to crash. If you do not know what a service does or are unsure of the consequences, leave it alone. Some services are critical to Windows XP's operations, so make sure you understand what the service is before you disable it.
1. Click Start/Run, or rather press windows+r type services.msc, you will see the Services console. The description of the software or services that you are disabling are clearly mention, so i guess you won't have any problems disabling it.
The servies could be manual, automatic or you could just use that services to run the service as in the case of cmd messenger.
Manual services: are only started in Windows XP when you start a process that requires the service. Some other process may require the service that has a "dependency" relationship with it; in this case, the dependency service will start, as well. Because these services do not start automatically when you boot Windows XP, you do not need to do anything with manual services.
Automatic: are those that actually starts when xp boots. These are the services that increase boot time. while many of them are necessary and important there are still plenty that you do not need which increases the boot time. Stop the services that you do not want or want to manually start after xp loads.
Computer Browser: If your computer is not on a network, you don't need this service. If you are on a network, leave it alone.
DHCP Client: If you are not on a network, you do not need this service. If you are on a small workgroup, you can still increase boot time by configuring manual IP addresses.
DNS Client: If you are not on a network, you do not need this service. If you are, leave it alone.
Error Reporting and Event Log: You don't have to use these services but they can be very helpful, so I would leave them configured as automatic.
Fax: If you don't use your computer for fax services, you can disable this one.
Help and Support: If you never use the Windows XP Help and Support Center (found on the Start menu), you can disable this service.
IMAPI CD-Burning COM: This service enables you to burn CDs on your computer. If you never burn CDs, you can disable the service.
Indexing Service: Your computer keeps an index of files but if you rarely search for files, the service is just a resource hog. You can stop it and turn the service to manual.
Windows Firewall/Internet Connection Sharing: If you do not use these features, you can disable them.
Infrared Monitor: If you do not use infrared devices, you can disable this service.
Messenger: This service sends alert messages on a local area network (it is not the same as Windows Messenger). If you are not on a network, you can disable this service.
Print Spooler: If you do not do any printing from the computer, you can disable this service. If you print, make sure you leave it as automatic.
Remote Registry: This service allows remote users to modify the Registry on your computer. If you are not on a network, you can disable this service.
System Restore Service: This service allows you to use System Restore. If you have turned off System Restore anyway, you do not need to turn off the service. If you do, you turn off System Restore.
Themes: If you do not use themes, you can disable this service.
Windows Image Acquisition: If you do not use scanners or digital cameras, you can disable this service.
Wireless Zero Configuration: If do not use wireless networking devices, you can disable this service
2. Disable unused ports.
Run-devmgmt.msc where you could disable your unused ports or any kind of input devices that you are not connected with. As for me i disable the fingerprint reader which i don't use normally.
3. Run-regedit (Registry Editor)
i).Locate the following key in the registry:
HKEY_LOCAL_MACHINE\SYSTEM\CurrentControlSet\Control\SessionManager\MemoryManagement\PrefetchParameters
*Make sure you backup the keys by exporting them to a .reg file.
ii).On the EnablePrefetcher value, change the setting from 3 to 5 (decimal).
iii).Close the registry editor.
iv).Restart your computer
4. Disabling recent documents history
i. Open the Registry Editor (select Start/Run, type regedit, and click OK).
ii. Navigate to HKEY_CURRENT_USER\Software\Microsoft\Windows\ CurrentVersion\Policies\Explorer.
iii. Create a NoRecentDocsHistory D_WORD key. Double-click the value to open it once it is created.
iv. Set the Data Value to 1 to enable the restriction.
v. Click OK and close the Registry Editor. You'll need to restart the computer for the change to take effect.
5. Run-msconfig, at the startup tab you will see some services which runs when windows starts, disable those which are not helpful or necessary.
6. Remove the boot logo
You can remove the boot logo that appears when you start Windows XP. This will probably shaves only a few seconds off your boot time. The disadvantage is that if you remove the boot logo, you will also not see any boot messages, such as check disk. (But if you are not having problems with your computer, remove it.)
To remove the boot logo:
i. Select Start/Run, type msconfig, and click OK.
ii. In the System Configuration Utility, click the BOOT.INI tab.
iii. On the BOOT.INI tab, click the NOGUIBOOT check box option. Click OK.
7. Deleting unused fonts.
The more fonts you have, the more processing Windows XP has to do to prepare all of those fonts for use. You must be a bit careful here to not remove fonts that you might want, but there is a good chance that you can live without many of them. For instance, you may have foreign language fonts and other symbol fonts (such as Wingdings) that you never use.
To delete unneeded fonts, follow these steps:
i. Open the Fonts folder in Control Panel.
ii. Delete those are not useful.
* Make sure that you do not delete necessary fonts as they might cause you to display information incorrectly on your notepad, wordpad and other documents file.
8. Stopping Remote Assistance and Remote Desktop Sharing
In Windows XP Professional, you have two remote networking features called Remote Assistance and Remote Desktop Sharing. These remote networking features are very helpful in a variety of situations but if you don't use them, it is good idea to disable them to save boot time. You can always enable them later if you want to use them.
Note:
i. Open the Start menu, right-click My Computer, and choose Properties.
ii. Click the Remote Tab.
iii. Clear both check boxes to disable Remote Assistance and Remote Desktop.
9. Decrease dual-boot time out.
If you dual-boot your computer with Windows XP and another operating system, you see an operating system selection menu on startup. If you typically boot into Windows XP and not the other operating system, you can speed up the dual-boot timeout value so that you do not wait so long for the boot process to select your default operating system and continue with the boot process.
Follow these steps:
i. Locate the boot.ini file on your computer. It is a hidden file by default; it is located in C:\boot.ini.
ii. Open the file with Notepad (which is what opens it by default).
iii. Change the Timeout value to 10.
iv. Select File/Save and close Notepad.
With all these setting done, your windows would possibly boot half less than the normal booting time.
Friday, June 27, 2008
How to bypass filters, college servers.
Well guys, i know how boring it is to be under a paranoid firewall and filters. You want to be free, do anything you want anywhere, not only at your workplace but to keep you more secure. Well you can try the your-freedom software. It is easy and on top of that it's free!!!
Step 1: You need to install Java runtime environment and then download yourfreedom
Step 2 : Well i have installed what's next?? configure the settings, well you need to know thoroughly what kind of an internet connection you are having. I will give a random I.P. address and gateway which is common in offices, schools and colleges.
The Wizard guide could help you locating the your-freedom servers ie nearest to your location. There are plenty of your-freedom servers in the world which of course got different i.p.
Step 3: You need to have an account premium, free whatever.. Get yourself registered at www.your-freedom.net.
Step 4:
(i)In the first dialog you can see server selection, as i have told you your freedom got plenty of servers 18 upto when i was using. You can put the name of the server you wanted to use ( listen carefully here, if their site was blocked the whole software won't work, instead you can use their i.p. that's your last option as i have mentioned that every server got their own i.p. )
you can change the protocol to https as it is more secure than http and that will generate a random port and you can just use that.
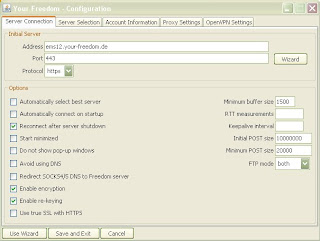
Here are the list of servers available, i'm positive that there are plenty of new servers, check it out on their site.
The IP address of ems12.your-freedom.de is 91.121.10.82
The IP address of ems11.your-freedom.de is 87.98.217.227
The IP address of ems07.your-freedom.de is 81.169.187.111
The IP address of ems01.your-freedom.de is 67.159.5.116
The IP address of ems02.your-freedom.de is 193.164.133.61
The IP address of ems03.your-freedom.de is 91.121.10.81
The IP address of ems09.your-freedom.de is 85.214.73.35
The IP address of ems08.your-freedom.de is 91.121.2.175
So, even if the ems12.your-freedom.de is not working you can try the i.p. instead.
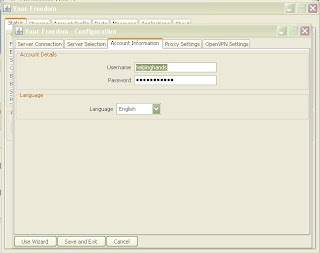
(ii) For the account information you have to put the one that you have used for registering in your-freedom.net.
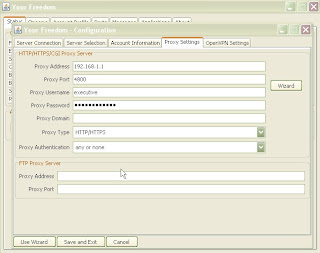
(iii) Proxy-settings is where you configure your type of ethernet, it will of course differ from place to place as i have show in the figure my proxy needs authentication, so be sure to enter every information correctly.
That's it the settings are done then click save and exit at the bottom which will direct you to the main dialog. Then click on start connection, on the messages tab you will see that you are connected or not.
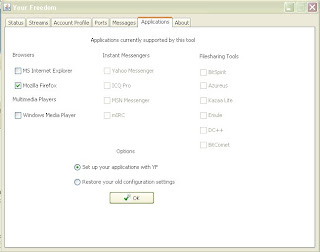
Step 5: I suggest you to user more than one browser as you will often have to change the settings of your browser. Use a dedicated browser esp for yourfreedom.
On the applications tab you will the options you had depending on the server you are using it will differ. You can tick on the browser you wanted to use and then click on set up application with y/f. That will save the setting of your original browser settings, so you can later restore them
Well, that's it. Use the settings you have just use to browse the net, now you can open everything... enjoy!!!
Step 1: You need to install Java runtime environment and then download yourfreedom
Step 2 : Well i have installed what's next?? configure the settings, well you need to know thoroughly what kind of an internet connection you are having. I will give a random I.P. address and gateway which is common in offices, schools and colleges.
The Wizard guide could help you locating the your-freedom servers ie nearest to your location. There are plenty of your-freedom servers in the world which of course got different i.p.
Step 3: You need to have an account premium, free whatever.. Get yourself registered at www.your-freedom.net.
Step 4:
(i)In the first dialog you can see server selection, as i have told you your freedom got plenty of servers 18 upto when i was using. You can put the name of the server you wanted to use ( listen carefully here, if their site was blocked the whole software won't work, instead you can use their i.p. that's your last option as i have mentioned that every server got their own i.p. )
you can change the protocol to https as it is more secure than http and that will generate a random port and you can just use that.
Here are the list of servers available, i'm positive that there are plenty of new servers, check it out on their site.
The IP address of ems12.your-freedom.de is 91.121.10.82
The IP address of ems11.your-freedom.de is 87.98.217.227
The IP address of ems07.your-freedom.de is 81.169.187.111
The IP address of ems01.your-freedom.de is 67.159.5.116
The IP address of ems02.your-freedom.de is 193.164.133.61
The IP address of ems03.your-freedom.de is 91.121.10.81
The IP address of ems09.your-freedom.de is 85.214.73.35
The IP address of ems08.your-freedom.de is 91.121.2.175
So, even if the ems12.your-freedom.de is not working you can try the i.p. instead.
(ii) For the account information you have to put the one that you have used for registering in your-freedom.net.
(iii) Proxy-settings is where you configure your type of ethernet, it will of course differ from place to place as i have show in the figure my proxy needs authentication, so be sure to enter every information correctly.
That's it the settings are done then click save and exit at the bottom which will direct you to the main dialog. Then click on start connection, on the messages tab you will see that you are connected or not.
Step 5: I suggest you to user more than one browser as you will often have to change the settings of your browser. Use a dedicated browser esp for yourfreedom.
On the applications tab you will the options you had depending on the server you are using it will differ. You can tick on the browser you wanted to use and then click on set up application with y/f. That will save the setting of your original browser settings, so you can later restore them
Well, that's it. Use the settings you have just use to browse the net, now you can open everything... enjoy!!!
Subscribe to:
Comments (Atom)


